Plant propagation
CATEGORIES
The terms used here are not necessarily correct technical terms. In many cases, as far as I know, there are no technical terms when it comes to some modern plant propagation techniques. The terms are more intended to facilitate understanding of what is a suitable method of propagation for each individual plant in the forest garden.
It is common to divide plants' ability to propagate into two main categories: sexual and non-sexual propagation.
In sexual reproduction, the genetic material from the female and male plants is combined in the seed, which acquires a unique genetics with traits from both parents. The advantage of sexual reproduction is that plant species adapt to environmental changes and can colonize areas where they previously could not survive. New forms of flowers, leaves, hardiness traits, and disease resistances develop within the species. The downside is that the seed may lose many of the special qualities of the parent plant—such as fruit size and quantity. In many cases, the plant is not cultivated to produce large yields or serve other purposes, and thus reproduction from seeds will be the cheapest and easiest way to grow the plant.
Seeds
In asexual vegetative reproduction, the plant produces clones that are genetically identical to itself. This type of reproduction often occurs naturally and in a variety of different ways. Some plants reproduce vegetatively by producing a mass of roots and shoots that are capable of living as separate plants. Other plants can create new shoots from ground-running stems or other specialized organs. In this way, the plant can colonize an area much faster than through seeds. There are many methods that can simulate or exploit the plants' tendency to reproduce in this manner.
4 methods are introduced here
Splittings | Offshoots | Grafting | Cuttings
Seed
It is far better to grow plants from seeds in controlled environments in a greenhouse or conservatory for several reasons. Many seeds take a very long time to germinate, and in a greenhouse, they are free from competition with weeds. Seeds from trees and shrubs are also at the top of the menu for a wide range of rodents and birds. If the seeds also need to be stratified first, they have a long season in the soil before they start to germinate.
If you have enough space, feel free to save seeds that have had a low germination rate and plant them again next year. A good well-drained seed compost is also important to create good contact with the seed without it drowning from lack of oxygen. A seed compost does not need any nutrients because the seeds are not meant to grow for long in it. I do not recommend a regular homemade compost from the compost bin since it often contains a lot of weed seeds. Organic seed compost is not very expensive and goes quite a long way. Mix in some vermiculite to create good drainage. To avoid slug attacks, it is wise to create a setup where seed trays or root trainers are placed slightly above the ground, making them less accessible to slugs. In cool temperatures with high humidity, mold can also become a problem. Good ventilation and warmth are the cure, which means either a heat fan or a later start in the spring. A number of pest insects announce their arrival a bit later in the spring, and yellow sticky traps are invaluable for catching most of them. It’s a good idea to set them up in two rounds if the traps become overcrowded during the season.
The largest predatory insects can easily free themselves from these traps. If the greenhouse weevil becomes a problem, there is a good ecological control method using nematodes that can be purchased in powdered form, which can be mixed with water and watered onto the seed compost. The nematodes live as parasites on the weevil and quickly take its life. If the seedlings suddenly stop growing in the middle of summer, they are likely lacking a symbiosis with a mycorrhizal fungus that they need to grow; this happens quite often with conifers. The best way to establish a symbiosis is to take some surface soil and conifer debris from under a well-established conifer and sprinkle it on top of the compost soil around the seedling. It will soon start to grow again.
Splittings
Splitting of single shots
Some species can be divided at each little shoot that appears early in the spring. A good portion of the root must accompany each shoot, and one must put in some effort to cause as little damage as possible. Such plants require greater protection after division from the weather and wind and benefit from establishing themselves in a greenhouse.
Splitting of root shoots
Some shrubs and trees produce suckers that can be separated from the main stem. This should ideally be done early in the spring before the plant starts to grow. Gently lift the sucker with a garden fork to see if it has independent roots. If so, it can be cut off close to the parent plant. Divide the suckers so that each one has independent roots. Cut off half of the top growth to avoid moisture loss. They should be watered regularly until the roots have established themselves.
Splitting of shrubs with root shoots:
- Lift an underground branch early in the spring with a garden fork without disturbing the main plant. Check that there are fibrous roots at the base of the root shoot.
- Cut the root shoot with pruning shears close to the parent plant. Gently push soil around the parent plant.
- Cut the main stem of the root shoot back to the fibrous roots. Cut away about half of the top growth to prevent moisture loss.
- The root shoot can be planted directly in a new location or potted in a greenhouse if it is weak.
Splitting of bunches
Division of 1 plant into several independent plants. This method takes advantage of some perennials' tendency to produce a clump of tightly intertwined shoots. They have a clump shape that can be split or divided into several shoots with independent roots. This is quick and easy, but only yields a few new plants. It often needs to be done in the spring when the plant lacks foliage that requires water. This is also a time when the roots easily establish themselves. It is best to use a gentle hand to pull the parts apart, but a spade can also be used if the parts are physically intertwined. This method does not work for perennials with taproots. A few shrubs have clump-forming roots and can be divided like perennials. You can find the instructional video for dividing perennials here.
Offshoots
Some plants form adventitious roots from root or stem cuttings where they touch the ground. They function like cuttings that are still attached to and protected by the parent plant, and therefore do not require as controlled an environment as cuttings do. Offsets also do not require as much knowledge and aftercare as grafting. Strawberries are perhaps the perennial most known for their ground-running stems, but most perennials, shrubs, and trees can be propagated vegetatively in this way. By damaging the stem, one can take advantage of the plant's tendency to form new roots at the injury site while still attached to the parent plant. Once new roots are formed, it can be cut from the parent plant and grown individually.
Simple offshoot
If you need to get new plants, this method is a simple and quick way that works on a variety of plants. It works best early in the spring and in the fall. Spring works best for evergreen trees and fall for deciduous trees.
Simple offshoots of climbers:
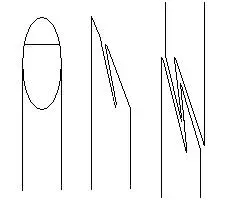
- Select a young low-growing shoot in the fall. Remove leaves and side shoots at least 30 cm from the stem behind the tip of the shoot.
- Make a slanted cut on the stem (on the opposite side of the shoots or the underside, and midway between the shoots where the stem is completely bare) that is about 2.5 cm long - a tongue.
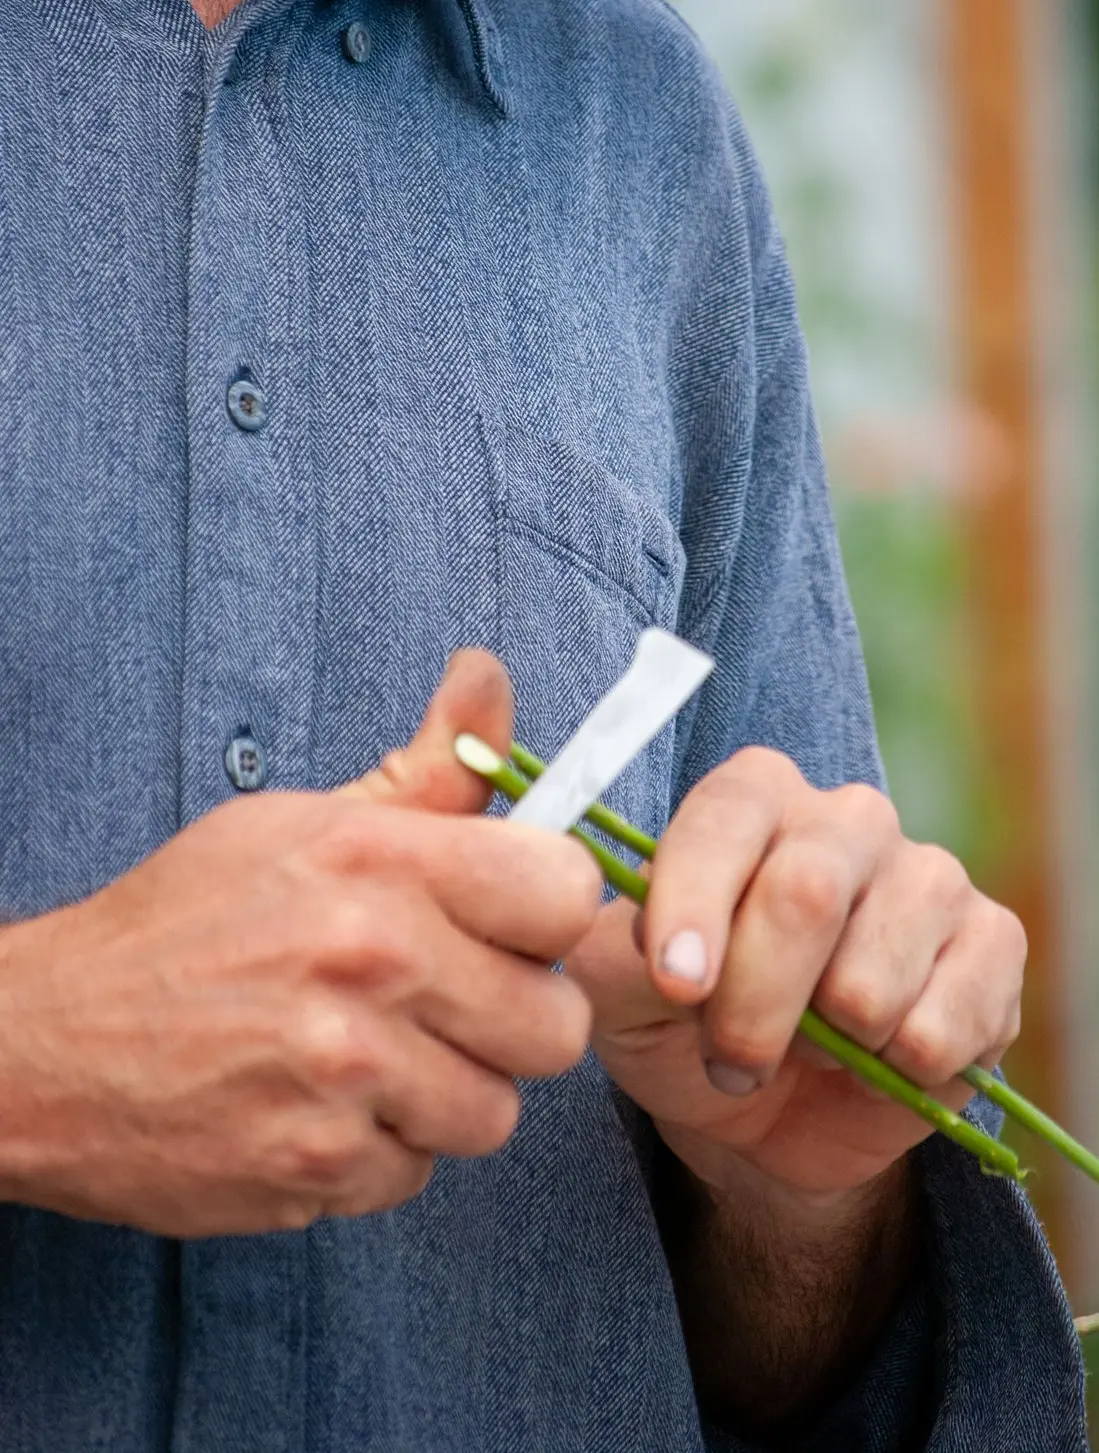
- Put on rooting hormone bag.
- Pin down the stem where it is bare, but wounded down. Take 8 cm of soil over it. Attach the tip of the shoot to a stick so that it grows upward.
- When sufficient roots have developed (usually the following fall), the cutting is removed.
Simple cuttings of shrubs (+ some perennials):
- Mark the spot where the selected branch touches the ground with a stick. Create a sloping trench in the soil from the stick towards the bush. The trench should be about 3 inches deep.
- Secure the branch firmly about halfway in the trough. Bend the tip of the branch upward and attach it to the stick. Fill the trough with loose soil and water well.
- The branch can be cut from the trunk when the roots are well established.

Simple tree cuttings:
- Mark the spot where the selected branch touches the ground with a stick. Create a sloping trench in the soil from the stick towards the bush. The trench should be about 8-15 cm deep.
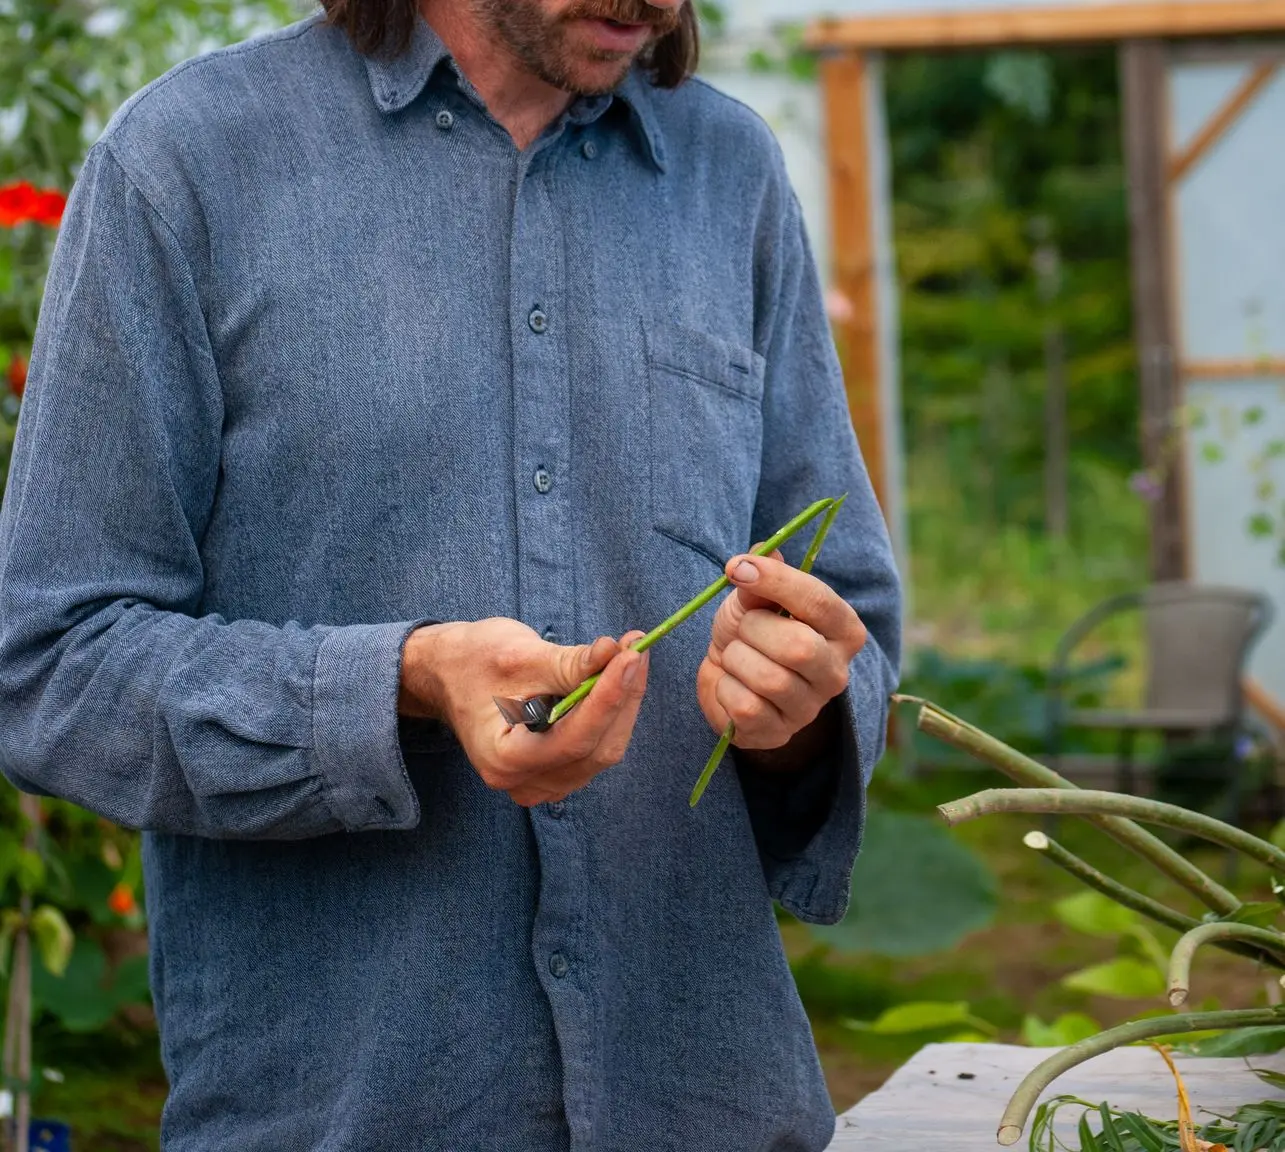
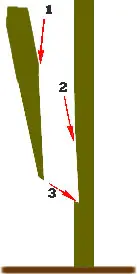
- Select a strong and healthy shoot from last season's growth. Make a damage cut 30 cm from the tip, on the underside of the branch. Cut a strip of bark 2.5-5 cm or create a tongue that you open with a matchstick.
- Dip in rooting hormone bag Dip in rooting hormone solution and also pour rooting hormone solution on the soil where the branch will be attached. Secure the branch firmly on both sides of the wound at a depth of 8-15 cm. Bend the tip of the branch upward and attach it to the stake. Fill the trench with loose soil and water well.
- The branch can be cut from the trunk when the roots are well established. Deciduous trees should be cut in the fall, while evergreens should be cut early in the spring. It should grow in a pot in a greenhouse for 2-5 years before being planted outside.
Earth mound offshoots
Nice technique for older herbaceous perennials and shrubs. Mix some soil with peat and sand in the spring and build it up around the base of the plant in the spring. Replace it if it gets washed away by rain. Water regularly. By late summer, roots have formed on several of the stems that can be cut off and grown as individual plants.
Air offshoots
A technique used on shrubs, trees, or climbers that do not have branches that reach the ground. It is often best to create air layers in the spring that can be individually replanted in the fall or the following spring.
- Select a 1-2 year old shoot that is straight and lush (annual shoots that have matured a bit for trees). Cut off side shoots and leaves (do not leave the stubs) about 30 cm from the branch.
- Make a 3 cm diagonal cut towards the center of the branch - towards the tip of a shoot. Apply rooting hormone bagWrap the wound with some damp sphagnum moss, also inside the wound to keep it open. (Trees can also be damaged by cutting out a 1-2.5 cm wide ring of bark).
- Carefully wrap the wound with sphagnum moss using black plastic and secure it with tape at both ends.
- Check the wound occasionally to look for root formation. Wait until next spring if the root formation is weak.
- When new strong roots have formed, the plastic can be carefully removed. Cut the branches just below the root ball, and gently remove any excess moss. Air layers of trees are cut at an angle just above a leaf bud, and a little top growth is removed if there is a lot to stimulate root growth.
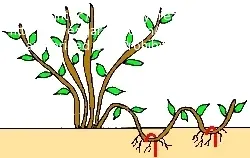
Snake offshoots
Fine technique for many climbers, who create long shoots every year. In the spring, one takes a branch from the previous year's growth down to the ground. Leaves and side shoots are removed. One can damage the branch between the shoots as simple cuttings to accelerate root formation. Secure the branch between the shoots with the wound facing down and lay it along the ground like a snake (space-saving). Often, the cuttings will have sufficient roots by autumn and can then be treated as self-made cuttings.
Self-made offshoots
Some low-growing climbers and perennials naturally root as they grow along the ground. Then, it is simply a matter of lifting a shoot that has rooted with a garden fork, cutting it off, and cultivating the cutting as an independent plant. Alternatively, one can cut off the stem or the ground-running stem on both sides and let it grow as an individual plant where it is already established.
Grafting techniques
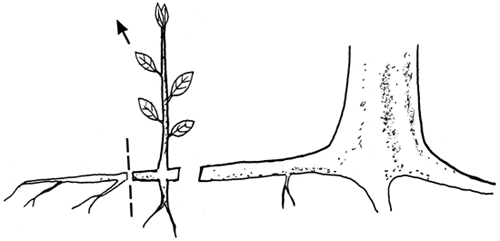
To separate plants are joined so that they function as one. The root system, the rootstock or root of a plant is united with the top growth or scion. Although the rootstock has a significant influence on the scion (e.g., size and immune system), the genetic identity of the two parts is maintained. For example, in fruit trees, it is very useful to use a rootstock that provides low growth, high fruit production, and a good immune system. Close kinship between the parts is a prerequisite for success. In many cases, established useless trees in the garden can be transformed into productive fruit trees. Grafting must occur quickly after cutting so that the surfaces remain moist. Strict hygiene and sharp knives are important. The cambium layer in both parts must be in contact because that is where the bridge between the two is formed. Warm temperatures help growth. Typically, a scion is grafted onto a 1-2 year old rootstock.
Tile germination
This technique is done in July and August
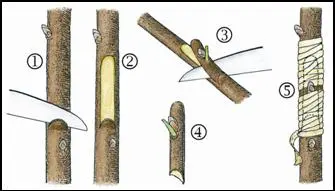
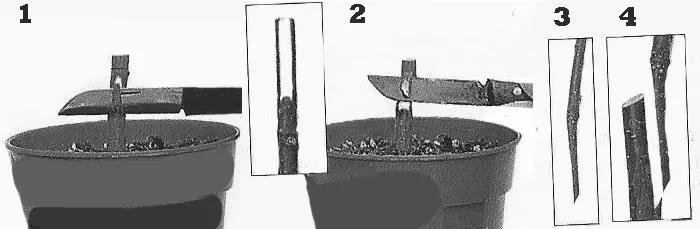
- Cut off a sprout of what you want. This is a fresh growing shoot that can dry out very quickly. Remove all the foliage and leave just a small stem. If you are not going to graft immediately, the sprout must be stored cold and moist.
- Cut "chips" from the trunk. The trunk should ideally be 60-90 cm high. Remove branches under 30 cm. The chip cut is made about 15 cm above the ground. Make a 5mm deep cut (1). Then make a new slanted cut that starts 2.5-5 cm above the first cut. Cut downward until you meet the first cut. Remove the chip (2).
- Cut an identical slice from the sprout branch where the diameter is ideally the same as that of the rootstock from which the slice is taken. Choose a small, fresh shoot below the leaf stem and make a short cut just over 1 cm below it and an angled cut just over 1 cm above it (3). Hold the slice by the leaf stem and avoid touching the wood.
- Place the scion (4) into the cut on the rootstock and secure it with grafting tape (5). The sprout will most often remain dormant until next year, but it can start to sprout in the fall. 5- Cut the rootstock just above the new sprout in the winter after it has started to sprout.
Cleft grafting
Existing fruit trees can be grafted to one or more varieties. Wild-growing trees can be grafted to a fruit tree in the spring. Common wild-growing hawthorn can for example be grafted with pears, and blackcurrant can be grafted with plums.
- Buy or cut a scion in December or January. The scion is last season's growth from the tree you want. The scion must be cut when the tree is fully dormant.
- Grafting is done in April or May and is weather-dependent. Graft when a period of warm weather is forecasted.
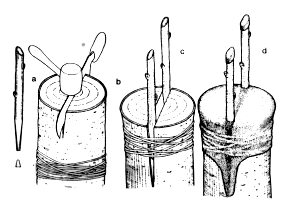
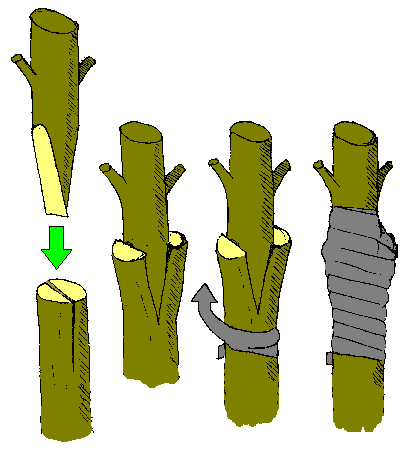
- Cut off the top of the tree or the main branches so that only the stump remains. The optimal diameter of the stump or main branches is between 4 and 7.5 cm, which is also crucial for where the cut should be.
- Create a cleft in the center of the stump or branch with a grafting or pruning knife by striking the knife down into the stump with a hammer (b). The cleft should be 7-10 cm deep.
- Take out the grafting knife and press a flathead screwdriver down into the center of the split to make room for the grafting shoots.
- Cut two grafting shoots for each stump or branch. On each grafting shoot, two slanted cuts of about 5 cm must be made to create a V shape at the bottom of the grafting shoot (a). Each grafting shoot should have 3-4 good buds.
- Insert the grafting shoots on each side of the stump or branch (c). Try to align the inner side of the bark on the stump with the outer side of the bark of the grafting shoot. Use the screwdriver to push them well into the cleft.
- Wax over or use grafting tape on the entire cut surface of the stump or branch (d).
- If the grafting is successful, the grafted shoots will start to grow after 2-3 weeks. If both grow, one can be cut off. Since the root system is already established, the grafted shoot will bear fruit within one or two years.
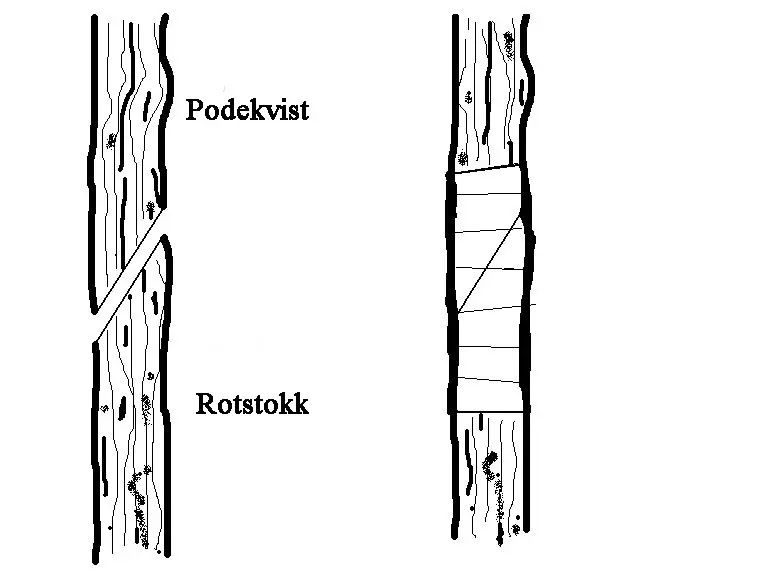
Whip
Method for trees, shrubs, and climbers where the rootstock has the same diameter as the scion. A semi-mature or hardwood scion of 8-10 cm with a leaf bud at the base is given a slanting cut of 2.5-3 cm at the base on the opposite side of the leaf bud. The rootstock of 2.5-8 cm is given a corresponding cut. The cambium layers of the two meet and are secured with grafting tape.
Whip and tongue
This technique is used on shots that have a diameter of 5-15 mm.
- Buy or cut a scion in December or January. The scion is last season's growth from the tree you want. The scion must be cut when the tree is fully dormant.
- Store the cutting in wet newspaper in plastic bags in the refrigerator until it is to be grafted.
- Buy the base stock if you need it.
- Plant in a sheltered spot from February to May - depending on the climate where you live.
- Make a 2.5-5 cm long slanted cut on the grafting shoot (the whip). Ideally, the grafting shoot should have 2-4 buds, but one bud is often sufficient.
- Make a new cut on the grafting branch that starts 1/3 down from the slanted cut and cut the next one parallel to the slanted cut (the tongue).
- Make identical cuts on the rootstock where the diameter is exactly the same as the scion.
- Place the tongues together and apply pod tape. The pod tape prevents it from drying out and provides extra support for the wound to heal. Secure the tape well.
- Some species need warmth at the grafting site for it to heal. Apples need no assistance. Plums prefer around 20°C. Walnuts need it even warmer.
The grafted tree is set out and hardened for a year or two before it is planted in its permanent position. The whip and tongue technique is difficult to master. A grafting tool does just as good a job as a professional whip and tongue cut, and is a very simple alternative.
Side joint
Useful technique when the rootstock is larger than the scion. The technique is used just before bud break late in winter or early in spring. 2-year-old rootstocks propagated from seeds with a straight stem and a good root system in a pot are ideal.
- Buy or cut a scion in December or January. The scion is last season's growth from the tree you want. The scion must be cut when the tree is fully dormant. The scion is trimmed to 15-25 cm just above a bud and it is a great advantage if the base of the scion consists of 2-year-old growth. The scion is also given a slanted cut at the top.
- The rootstock is brought into a cold greenhouse with a minimum night temperature of 7-10°C, 2-3 weeks before grafting. The rootstock is kept dry to prevent too much sap flow, which can disrupt the union with the scion.
- Cut off the top of the stump about 8-10 cm above the ground. Make a downward sloping cut about 2.5 cm from the top. Make a new downward sloping cut from near the top of the rootstock that meets the innermost point of the first cut (1).
- Remove the strip of wood and make a new straight upward cut from the meeting point between the two previous cuts (2). This will result in a flat-sided trunk with a shoulder at the base.
- Make a slightly sloping 2.5 cm long cut that ends at the bottom of the grafting branch, with a bud on the opposite side. Then make a steeply sloping cut from the opposite side at the bottom of the grafting branch (3). The point is that the cuts should align with the cuts on the rootstock.
- Insert the grafting twig into the rootstock (4) so that the cambium layers meet. Cover the entire wound with grafting tape.
- Within a few weeks, a successful graft will show signs of growth; remove any root shoots. They will divert growth away from the grafted branch.
Side cladding joint
Technique used on trees that are difficult to graft or have very thin bark. Unlike the side grafting technique, the top of the rootstock is cut off after the scion has started to grow on the rootstock. This method is used right before bud break or in mid to late summer. If it is to be done in the summer, the scion must be cut in the morning from mature annual shoots, with the base from two-year-old shoots.
- Remove the leaves from the lower 15 cm of the stem.
- Near the bottom of the trunk, a downward-leaning cut is made a quarter of the way into the trunk (3).
- Make a 3 cm long flat cut down the main stem that meets the end of the first cut (2).
- Remove the leaves from the bottom 5 cm of the grafting twig. Cut it so that it matches the cut on the rootstock (1).
- Assemble the parts. It is very important that the cambium layers meet precisely.
- Put tape around the entire pod area.
- Placed under a plastic tent or tunnel with high humidity.
- Cut off the top of the rootstock above the graft when the scion shows signs of growth.
On shrubs and climbers, the lower leaves are removed from a 10-13 cm grafting shoot. The side joining cut is made 2.5 cm up on the rootstock. The cut itself is also 2.5 cm.
Top wedge grafting
Topping and grafting of trees
Useful technique for some trees that have a larger trunk than the grafted branch.
- Cut the main stem (about 2 years old) above a shoot near the root.
- Make a vertical cut 2.5-5 cm deep in the center of the base stem.
- Cut a grafting shoot with 3-4 buds from this year's growth that is about 15 cm long. Make two slanted cuts 2.5-5 cm long at the bottom of the grafting shoot so that it forms a wedge.
- Insert the wedge into the cut on the rootstock. Both cuts on the scion should be visible above the top of the rootstock.
- Put tape around the entire pod area.
Top wedge training of shrubs and climbers
For most shrubs and climbers, top wedge grafting is the best grafting method. It provides consistently good results and is easy to carry out.
- Cut a grafting shoot from a mature shoot from this year's growth, with good and dense buds at the tip.
- Prune the grafting shoot to 10-15 cm with 4-6 leaf buds. Make two 2-3 cm slanted cuts towards the base of the grafting shoot so that it takes the shape of a spear.
- Cut the stump down to 2.5 cm height. Make a 2-3 cm deep cut in the center.
- Push the tip of the grafting shoot down into the rootstock wedge. The cambium layer between the two must meet.
- Secure the pod with a thin rubber band and apply pod tape.
Cuttings
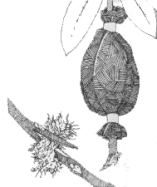
Utilizes the plant tissue from the stem, leaf, root, or shoot's ability to form a fully developed plant. "Adventitious roots" develop from wound sites, and this method involves cutting suitable plant parts that root under the right conditions. To succeed with this method, it is important to find a strong parent plant in good health. Materials from younger plants more often form roots. Water the parent plant well a few hours before cutting, especially for leaf cuttings. Quickly place the cutting or slip in soil or rooting medium to avoid loss of moisture. Good hygiene with sterile and sharp tools is important. A bottom heat of 15-25°C and cool air with high humidity (mini tunnels made of polyethylene are sold in garden shops) increases the chances of success. The soil or rooting medium must always be kept moist. Leaf cuttings root after about 3 weeks, while woody plants can take months - there are significant individual differences.
Herbaceous
Many perennials are easy to take cuttings from. Members of the mint family are especially accommodating. Cut a cutting and place it either in water until it develops roots or directly in moist soil. Cuttings that do not root as easily can be assisted by a more well-drained rooting medium, such as a mixture of peat, perlite, vermiculite, or sand. Do not use fertilizer with a high nitrogen content. Cuttings taken from the top growth of perennials are often from spring, early summer, or late summer growth and require a humid environment in the form of a growth tunnel or similar. Cuttings from new strong growth are preferred, ideally without flower buds. If it is difficult to take cuttings without flower buds, these should be removed. Cuttings are more likely to succeed in forming roots if they are given some bottom heat. They also need partial hardening off before being planted out. Almost all types of herbaceous cuttings are cut just below a leaf node where the active growth hormones are most active. A hormon bag is not always necessary but helps to speed up root development.
Leaf cutting
Leaf cutting of perennial
Some plants can form both roots and shoots from parts of a leaf or the entire leaf.
Partial leaf cuttings
- Cuttings made from parts of the leaf are divided into two pieces where the leaf's veins receive a wound on each side of the midrib that is discarded.
- The leaf cutting is placed in a well-draining rooting medium with the cut side down. Pack the soil around the base of the cutting. Place in a growth tunnel, plastic tent, or similar that creates a high humidity environment.
Full leaf cuttings
- Cut a strong and healthy leaf from the parent plant near the base of the leaf stem. Place it in a pot with some sand and some peat so that the base of the leaf just touches the rooting medium.
- Water well and place in a growth tunnel, plastic tent, or similar that creates a climate with high humidity. Protect from direct sunlight.
Leaf cuttings of shrubs
Method for making many cuttings from a shoot of a semi-mature branch to a bush or a climbing shrub. A leaf cutting only requires a short semi-mature stem.
- Cut a branch to the desired length. The number of cuttings can be determined by the number of leaf buds on the branch.
- Cut to the cuttings:
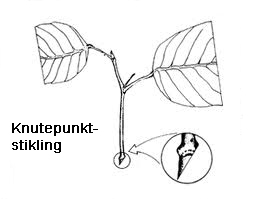
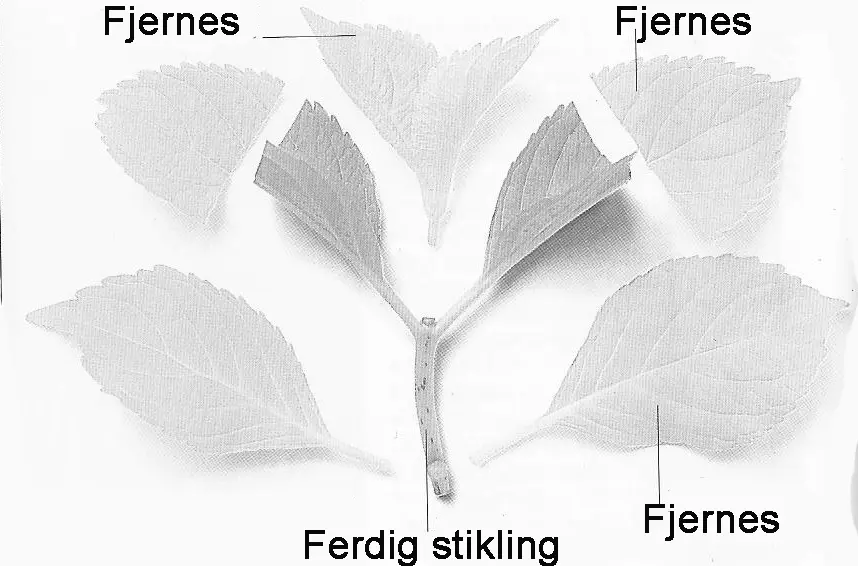
Junction cuttings
The cutting from shrubs and climbers that are slightly hollow often needs to include a node to a leaf bud at the base to succeed. At the top, it is cut just above a pair of leaves.
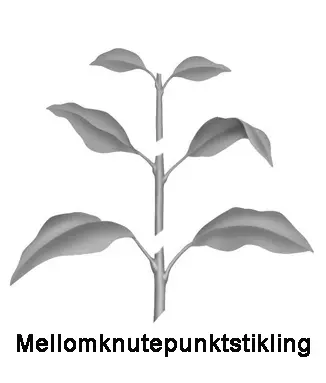
Intermediate node cuttings
No need for a leaf bud at the base of the cutting. It is also cut above a pair of leaves at the top.
3. The cutting should be immediately placed in a rooting hormone bag.
4. Place the cuttings in the rooting medium so that the leaves just barely stick out of the soil without touching it.
5. Place in a growth tunnel, plastic tent, or similar that creates a climate with high humidity. Roots should form after about 8 weeks.
Greenwood cuttings
Greenwood cuttings of shrubs and climbers
Like for softwood cuttings, but taken a bit later in the summer. Often, it is difficult to see the difference in the plant material, but there are only a few species where the difference is significant for success.
Greenwood cuttings of trees
Greenwood cuttings are taken when the stem of the annual shoot is slightly firmer and darker than that of the softwood cutting. This is during the period from late spring to mid-summer.
- Cut off a 25-30 cm long annual shoot at the junction between this year's and last year's growth.
- Remove the tip of the shoot just above a leaf bud. Remove the leaf closest to the base and make a damage cut (strip of bark) of 2.5 cm. Larger leaves are cut in half to reduce moisture loss. A finished cutting should be 8-10 cm long with 3 leaf buds.
- Set in A hormon bag.
- Place in individual pots or root trainers with 1 part perlite, fine sand or vermiculite, and 1 part peat. Water generously.
- Place in a growth tunnel, plastic tent, or similar that creates a climate with high humidity.

Hardwood cuttings
Hardwood cuttings of shrubs and climbers
The method for deciduous and evergreen plants is somewhat different. Cuttings from both are best taken in late autumn to mid-winter, when the annual growth has fully developed and when the deciduous plants have started to lose their leaves or have completely lost them. Hardwood cuttings are much larger than cuttings from softwood and semi-mature shrubs. The reason for this is that they form roots much later, so they need larger food reserves to draw from to survive the winter.
Deciduous:
- Create a cutting that is about 20 cm long. Remove any remaining leaves. Make a horizontal cut just below a leaf bud and an angled cut from the bud at the top. The tips of branches and branch material right at the base of the stem are unsuitable material for hardwood cuttings. If it is a species that has difficulty forming roots, it will help to make a damage cut (strip of bark) of 1-2 cm at the base of the cutting.
- Set in rooting hormone bag.
- Set in soil-based rooting medium. Must be extremely well drained (lots of sand helps) otherwise the cuttings will die. Only 5 cm of the top of the cuttings should be visible. Pack the soil and water well. Remove weeds immediately if they appear.
- Roots are formed late, so when the leaves sprout in the spring it is important to water them well because they can dry out quickly due to a fragile root system.
Evergreen:
- Cut the shoots into 20-25 cm long sections. Make the cut just below a leaf shoot at the bottom and just above a leaf shoot at the top. Remove leaves and side shoots from the bottom half of the cutting.
- Place 5-8 cuttings in a pot so that only the top half is visible. Roots normally form after 6-10 weeks if a bottom cap is used. Plastic tunnel to increase humidity is also beneficial.
Hardwood cuttings of trees
One of the simplest ways to propagate deciduous trees. Cuttings from hardwood are taken during the tree's dormant period, usually late in the fall right after leaf drop, or early in the spring just before bud break. The soil is warm at this time and provides a good foundation for root development. Hardwood cuttings can often be taken throughout the entire winter as well. These cuttings are taken from branches with a diameter of 0.6 to 1.5 cm, with the lowest cut just below a leaf bud and the upper cut just above a leaf bud. The length of the cutting is typically 15-30 cm. The cutting should be immediately placed in rooting hormone bag and then in sand, with 5 cm of the branch sticking up out of the sand. You can also make a bundle of up to 10 cuttings. Sand without any soil provides better protection against temperature fluctuations in winter. The sand must be kept somewhat moist throughout the winter. Just before bud break in spring, the cuttings are placed in individual pots or root trainers.
Heel cuttings
For plants that find it difficult to form roots via cuttings, heel cuttings are a great method. The heel forms an area where the natural growth hormones accumulate, which in turn increases the likelihood of root formation. For trees, the method is used on trees with vigorous growth on the branches, such as shelves, or slightly older or weak trees. The method is not as effective on broad-leaved trees. Works on all types of growth from softwood to hardwood for trees, from all types of growth from greenwood to hardwood on shrubs and climbers. For shrubs and climbers, a fresh side shoot from this year's growth is used.
- Tear off a branch from the trunk so that a “heel” of bark from the main trunk is included. The side shoot should be about 10 cm long for shrubs and climbers.
- Remove the bottom leaves and cut off the tail of the heel with a sharp and sterile knife.
Club cuttings
- Club cuttings are taken from the previous year's stem - early in the summer for deciduous plants, in the fall for evergreens. Select a short side shoot of new year's growth (approx. 10 cm long) and cut just above and below the side shoot on the stem - so that the stem is approx. 1 cm long. The stem will then look like a club at the base of the cuttings.
- Remove the bottom leaves and the soft tip of the cuttings. The club is cut thinner if it is thicker than 5 mm. Then treat the cuttings as a semi-ripe cuttings.
Softwood cuttings
Softwood cuttings of shrubs and climbers
Softwood cuttings from shrubs and climbers are taken in spring and early summer.
- Make a cuttings with 2-3 pairs of leaves. Cut just below a leaf shoot.
- Remove the soft tip just above a leaf shoot and remove the bottom pair of leaves. Removing the tip encourages the plant to grow not from the top but from the base so that it creates a bushy growth from the start. In addition, growth hormones are redistributed to the base of the cuttings, ensuring better root growth. Also cut large leaves in 2 to reduce bag loss. The stem of the cuttings should be about 4-5 cm.
- Softwood cuttings must be gently inserted into the rooting medium; a prickly stick or pen can be used to make holes and pack the soil around them. The leaves should be just above the soil and not be in contact with each other.
- Water well and place in a growth tunnel, plastic tent or similar that creates a climate with high humidity. The cuttings should be placed in some shade.
Softwood cuttings of trees
Softwood cuttings are normally taken in late spring from the fast-growing tips of new annual shoots. These types of cuttings often form roots very quickly. They should be taken early in the morning and quickly placed in rooting medium as they dry out quickly.
- Cut off a 5-8 cm long, soft shoot. Cut in the union between this year's and last year's growth. If the shoot is longer than 8 cm, remove the tip of the shoot (to direct the growth hormones towards the base of the cuttings).
- Set in A hormon bag.
- Place in individual pots or root drains with 1 part perlite, fine sand or vermiculite and 1 part peat. Alternatively, rockwool can be used as a rooting medium. Water a lot.
- Place in a growth tunnel, plastic tent, or similar that creates a climate with high humidity.
- Remove dead or diseased leaves at regular intervals.
- Roots normally form after 6-10 weeks and the plant is normally ready to be planted out after 2-3 years.
Root cuttings
Root cuttings of perennials
Root cuttings are best taken during the plant's dormant period in early winter. A rule of thumb is that the thinner the cutting, the longer it should be. Very thin root cuttings should also be planted horizontally. Root cuttings must be protected from the cold and must not be exposed to freezing temperatures. Extra thin cuttings should not be exposed to temperatures below 7°C.
- Wash the root free of soil and cut the strongest part of the root as close to the crown as possible. Do not remove more than 1/3 of the roots from the parent plant.
- Cut each section into 5-13 cm long pieces (thinnest longest). To make sure it's the right way round, cut the bottom of the cuttings at an oblique angle.
- Make holes for the cuttings in the rooting medium, the top of the cuttings should be in line with the soil surface.
- Sprinkle a 1 cm layer of fine sand on top and place in a protected spot. Late-growing plants form roots more easily with bottom heat. Water only to prevent drying out until root formation is visible in spring. Root cuttings often produce a set of new shoots before the roots are formed.
Root cuttings of shrubs, climbers and trees
Some shrubs, climbers and trees can be propagated from root cuttings. Short parts of the root are replanted.
Wood cones
Woody cuttings take root most easily when the mother plant is young and produces many new, long and healthy shoots every year. The best cuttings are often the new growth that is not too flimsy and weak, nor the most energetic and vigorous, which tends to be hollow and therefore easier to rot. Cuttings should also be taken in the morning so that the water reserves built up overnight are still present in the plant. If you can't complete the cuttings immediately, they should be stored in clean plastic bags - in a cool place if it takes more than a couple of hours. All equipment should be sterile. Almost all types of cuttings benefit from artificial rooting hormones, and I've made a simple homemade root hormone recipe here which works well on most cuttings. By damaging the cuttings by removing a strip of bark at the base of the cuttings, you open up the area where cell division takes place. The purpose of this is to increase water uptake and root hormone uptake. Be careful not to make the wound too deep. Some plant species produce roots very quickly, making many steps in the procedures below superfluous.
Semi-mature cuttings
Semi-mature cuttings of shrubs and climbers
A great technique for making cuttings from a range of shrubs and climbers - evergreen and deciduous. Semi-mature cuttings are taken from annual shoots from mid-summer to early fall when they have become dark and hardy.
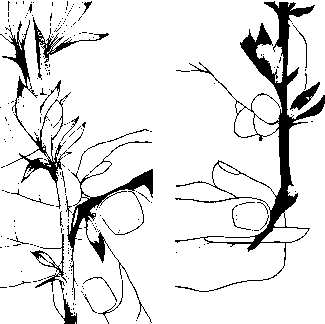
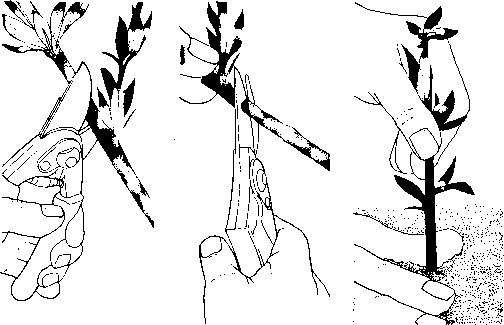
- Take an annual shoot that is soft at the tip and still actively growing, but has a hardened stem. The length of the cutting depends on the growth habit of the plant, but 6-10 cm is a suitable length for most plants. Cut off with pruning shears.
- Cut off all side shoots and prune them to a length of 10-15 cm by cutting just below a leaf shoot. Remove the bottom pair of leaves and the soft tip
- Make a damage cut (strip of bark) of 1-2 cm at the base of the cuttings.
- Set in rooting hormone bag.
- Place the cuttings in pots with a mixture of 1 part peat and 1 part fine bark or perlite. Alternatively, rockwool can be used. Pack the soil around the cuttings and water.
- Place in a growth tunnel, plastic tent or similar that creates a climate with high humidity. Gray-leaved plants should have somewhat less humidity
- Remove dead or diseased leaves at regular intervals.
- Roots are normally formed during the fall or winter, but normally need one more growing season of gradual hardening before planting out.
Semi-mature cuttings of trees
A great technique for making cuttings from broadleaf evergreens and many conifers. Semi-mature cuttings are taken from annual shoots in late summer or early fall when they have become dark and hardy.
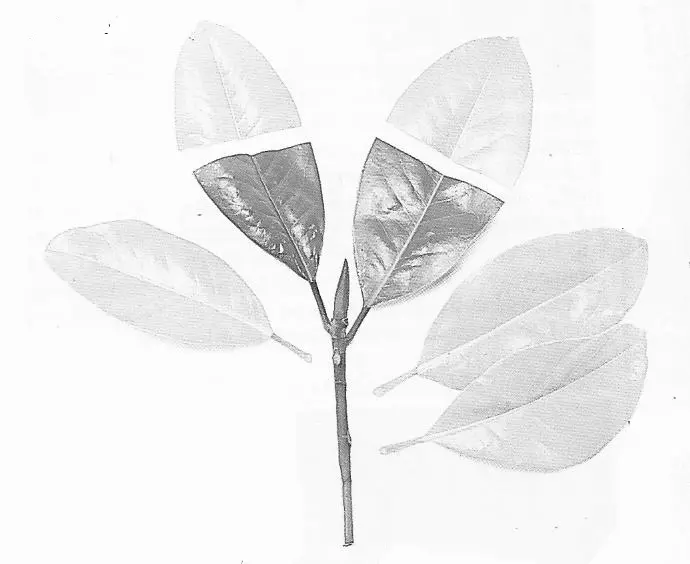
- Take an annual shoot that is soft at the tip but has a hardened stem. Use pruning shears to cut a 10-15 cm long cutting just above the shoot.
- Remove all leaves except the top two which are cut in half. This cut must be made with a sharp and sterile knife and is done to prevent bag loss. Make a 3 cm damage cut (strip of bark) at the base of the cuttings.
- Set in A hormon bag.
- Place the cuttings in pots with a mixture of 1 part peat and 1 part fine bark. Alternatively, rockwool can be used. The cuttings should only be placed far enough down so that they stand upright on their own. Pack the soil around the cuttings and water.
- Place in a growth tunnel, plastic tent, or similar that creates a climate with high humidity.
- Remove dead or diseased leaves at regular intervals.
- Roots normally form during the fall or winter.
Semi-mature cuttings of conifers and coniferous shrubs
Similar to the method for deciduous trees, but with some significant differences. Many conifers create new growth from specialized shoots: Top shoots or main shoots tend to grow vertically, side shoots horizontally. In many conifers, cuttings from side shoots will not grow like main shoots, but there are exceptions.
From early autumn to mid-autumn, as well as mid-winter, the likelihood of root formation is greatest. The rooting medium must be well-drained - 1 part peat, perlite, or vermiculite mixed with 1 part sand. If the cuttings require high humidity, use 2/3 sand. Do not pack the rooting medium. Cuttings are most often taken from last year's growth, which will also determine the length of the cutting. Side shoots and needles are removed from the lower third of the cutting. The small wounds that remain promote root formation. Place in rooting hormone bag very carefully. Roots typically form within 3 months. Does not tolerate frost. Roots form faster with a bottom heat of about 68°F.
Stem base cuttings
Stem base cuttings of perennial
This is a popular method because the cuttings quickly grow into full-grown plants and are therefore optimally equipped for a cold winter. A suitable rooting medium is one part peat mixed with one part sand. Should be protected from direct sunlight on hot summer days.
- When new shoots emerge from the base of a perennial that has grown 8-10 cm tall in the spring, the new shoot is cut off right up to the base of the perennial.
- Remove the bottom leaves and cut off just below a leaf shoot so that the cuttings are 5 cm long.
- Set in A hormon bag.
- Put in rooting medium. Water well and place in a growth tunnel, plastic tent or similar that creates a climate with high humidity. Bottom heat speeds up root development.
- When rooting is well underway after about 4 weeks, the cuttings can be repotted into individual pots.
Stem cuttings
Stem cuttings of perennial
Some long-stemmed perennials can be divided into 5-8 cm long sections. The top of each cutting is cut just above a leaf, and the base just below a leaf. Remove the bottom leaf or more leaves if there are many leaves on the stem - enough so that the stem is bare where it is in contact with the rooting medium. Treat further as stem tip cuttings.
Stem cuttings
Stem cuttings of perennials
Rockwool and vermiculite work well as a rooting medium for stem cuttings. Cuttings from spring and early summer growth have soft growth and are very fragile and break if bent or squeezed too hard. They often form roots within two weeks. Late summer cuttings can withstand far more, but are vulnerable to cold spells in early fall. Late summer cuttings take 4-8 weeks to form roots.
- Choose plants with dense and strong leaf shoots. Cut just below a leaf shoot 8-13 cm below the tip of the shoot. Cut off with a knife, not scissors.
- Place in a plastic bag until they can be pre-baked. Cut off the bottom leaves with a knife.
- Make a hole in the rooting medium with a pin or similar and insert the cuttings with the lowest pair of leaves just above the surface. Pack gently around the cuttings and water
- Place in a growth tunnel or similar that provides an environment with high humidity. They should be in good light conditions with a minimum temperature of 18°C.
- If the cuttings are planted in rockwool, they must not be removed from the rooting medium once they have formed roots, but replanted with the rooting medium.
Stem cuttings of shrubs
When the material has matured to such an extent that softwood cuttings or greenwood cuttings can no longer be taken, the branch often has growth on the tip, which has material that is completely soft in mid-summer. This tip is well suited as cuttings for many deciduous shrubs and some evergreen shrubs. These should then be made as node cuttings since many species will not form roots as intermediate node cuttings. Cut off 10 cm of growth and make a cuttings as for softwood cuttings of shrubs.